
The AI-Powered Developer
How to leverage AI coding agents and tools to boost your productivity as a developer

It's no longer big-news that AI is transforming the way software development is being done. With AI being more intelligent, ubiquitous and highly skilled at not just generating code but building fully featured applications from start to finish, this has given rise to AI coding agents and tools that automate how engineers build software in recent times.
With AI models like Claude Opus 4.6, Sonnet 4.6, OpenAI's GPT-5, Gemini 3, Qwen 3.5, and GLM being highly proficient at writing code, a wave of coding tools and agents have been released to help developers automate their work and become more productive. However, with great power also comes great responsibilities. Building with AI coding agents has a lot of advantages and also a lot of disadvantages. It could make you move fast in building features from end-to-end and it can also become a bottleneck when you run into bugs, performances, failing tests or just some bad coding conventions.
Let's be clear on one thing, this article is about software development with coding agents (context-based engineering) and not vibe-coding. For one, I have discovered a lot of people mix up the two more often than not. "Vibe-coding" is a term coined by Andrej Karpathy to describe using AI coding agents to quickly prototype applications from start to finish without any supervision or even knowing how the code works — hence the term “Vibes". Vibe-coding is ideal if you quickly want to ideate on ideas, prototype an ambiguous workflow or just build quick projects for a personal problem. However, if you are working on a production level project, vibe-coding is not an ideal practise because you will still be required to maintain and extend the application putting into consideration best practises to ensure user safety and security, code readability and performance advantages. Trust me telling the AI “don't make mistakes" will not get this done for you.

Now, I have made this clarification. Let's now delve (lol, sorry Paul) into AI powered software development otherwise known as context based engineering or prompt-based engineering — the former term (context based engineering) is more suitable to describe the act of using AI to write programs and software. Before I continue, it's important you know the meaning of certain terminologies that will be stated here.
LLM (Large Language Model): A type of AI trained on massive amounts of text data to understand and generate human language. Examples include GPT-5, Claude, and Gemini.
AI Agent: An AI system that can autonomously perform tasks on your behalf — like reading files, running commands, editing code, and making decisions — rather than just generating text in a chat window.
Prompt (noun): The instruction, question, or input you give to an AI model to get a response. Think of it as your request or command.
Prompt (verb): The act of writing and sending instructions to an AI model. When someone says “I prompted Claude to refactor my code,” they mean they gave it a specific instruction to do so.
Context Window: The maximum amount of text (input + output) an AI model can process in a single conversation. Think of it as the model’s short-term memory — anything outside the window, it can’t see or reference.
Token(s): The small chunks of text that an AI model reads and generates. A token can be a full word, part of a word, or even a punctuation mark. For example, the word “engineering” might be split into two or three tokens. Context windows and pricing are measured in tokens.
Coding agent: An AI agent specifically designed for software development tasks. It can read your codebase, write and edit code, run terminal commands, install dependencies, and debug errors, all within your development environment. Popular examples include: Claude Code, Cursor, Opencode, Codex and GitHub Copilot.
To learn more terms used in AI, check out the article below:
AI ABCs

Artificial Intelligence (AI) is rapidly transforming our world, and with its growth comes a new lexicon of terms that can be intimidating to newcomers. This "AI ABCs" guide aims to demystify some of the most frequently encountered concepts, presenting them in an easy-to-understand dictionary format.
What is Context Based Engineering?
Context-Based Engineering is the methodological use of AI coding agents across the software development process — not just to write code, but to build features end-to-end using the right prompts, context, and documentation. It's letting AI help you code on purpose, not just on vibes. You remain part of the process, verifying every outcome.
It goes beyond just text-generation or copying and pasting code generated by an ChatGPT — this time, the AI is actually accessing files in your computers, editing some, deleting some and creating some in order to build out features or integrations. AI coding agents can even run CLI (Command Line Interface) commands on your behalf and help review code. Whether your starting from scratch or initialising it in an existing codebase from scratch, AI coding agents are capable of getting this done most times even faster than you would on your own.
Speed comes at a cost. As Dijkstra put it, "If debugging is the process of removing software bugs, then programming must be the process of putting them in." AI makes programming way faster — this means that it can also write more bugs even faster. That's why you have to be methodical and meticulous when prompting an AI agent to write code for you and a good way to do that. If you don't, AI may end up generating code that is difficult to read, unmaintainable, and filled with bugs and security vulnerabilities. Doing context-based engineering correctly ensures AI produces code that is safer, more readable, and easier to maintain.
“Without requirements or design, programming is the art of adding bugs to an empty text file.” - Louis Srygley.
There are a number of advantages to using AI coding agents properly as part of your software development workflow — they include:
Build features faster by automating boilerplate code and generating complex logic patterns in seconds.
Ability to work on multiple tasks at once by offloading implementation details to the agent while you focus on high-level architecture.
Real-time research and troubleshooting to resolve technical blockers and syntax queries without ever leaving your IDE.
Proactive error detection that identifies potential bugs and edge cases during the writing phase rather than the testing phase.
Reduced cognitive load, allowing you to stay in “the flow” by automating the mundane, repetitive aspects of programming.
However if not done right, you can run into the following issues:
Code bloat, as AI agents tend to over-generate code, adding unnecessary logic and implementations that inflate your codebase and make it harder to maintain.
Reduced code quality when prompts are vague or context is insufficient, leading to poorly structured code, inconsistent naming conventions, and patterns that don’t align with your project’s architecture.
Security vulnerabilities introduced by generated code that may use outdated libraries, expose sensitive data, or implement authentication and validation patterns incorrectly, especially when the developer accepts output without thorough review.
Increased technical debt, as AI-generated code that "just works" piles up without refactoring, making the codebase difficult to understand and maintain.
Weakened problem-solving skills, as over-reliance on AI agents can dull a developer's understanding of core fundamentals and ability to debug complex issues independently.
So how can one do to properly use coding agents to automate software engineering without any disadvantages.
The Basic Architecture of Context-Based Engineering
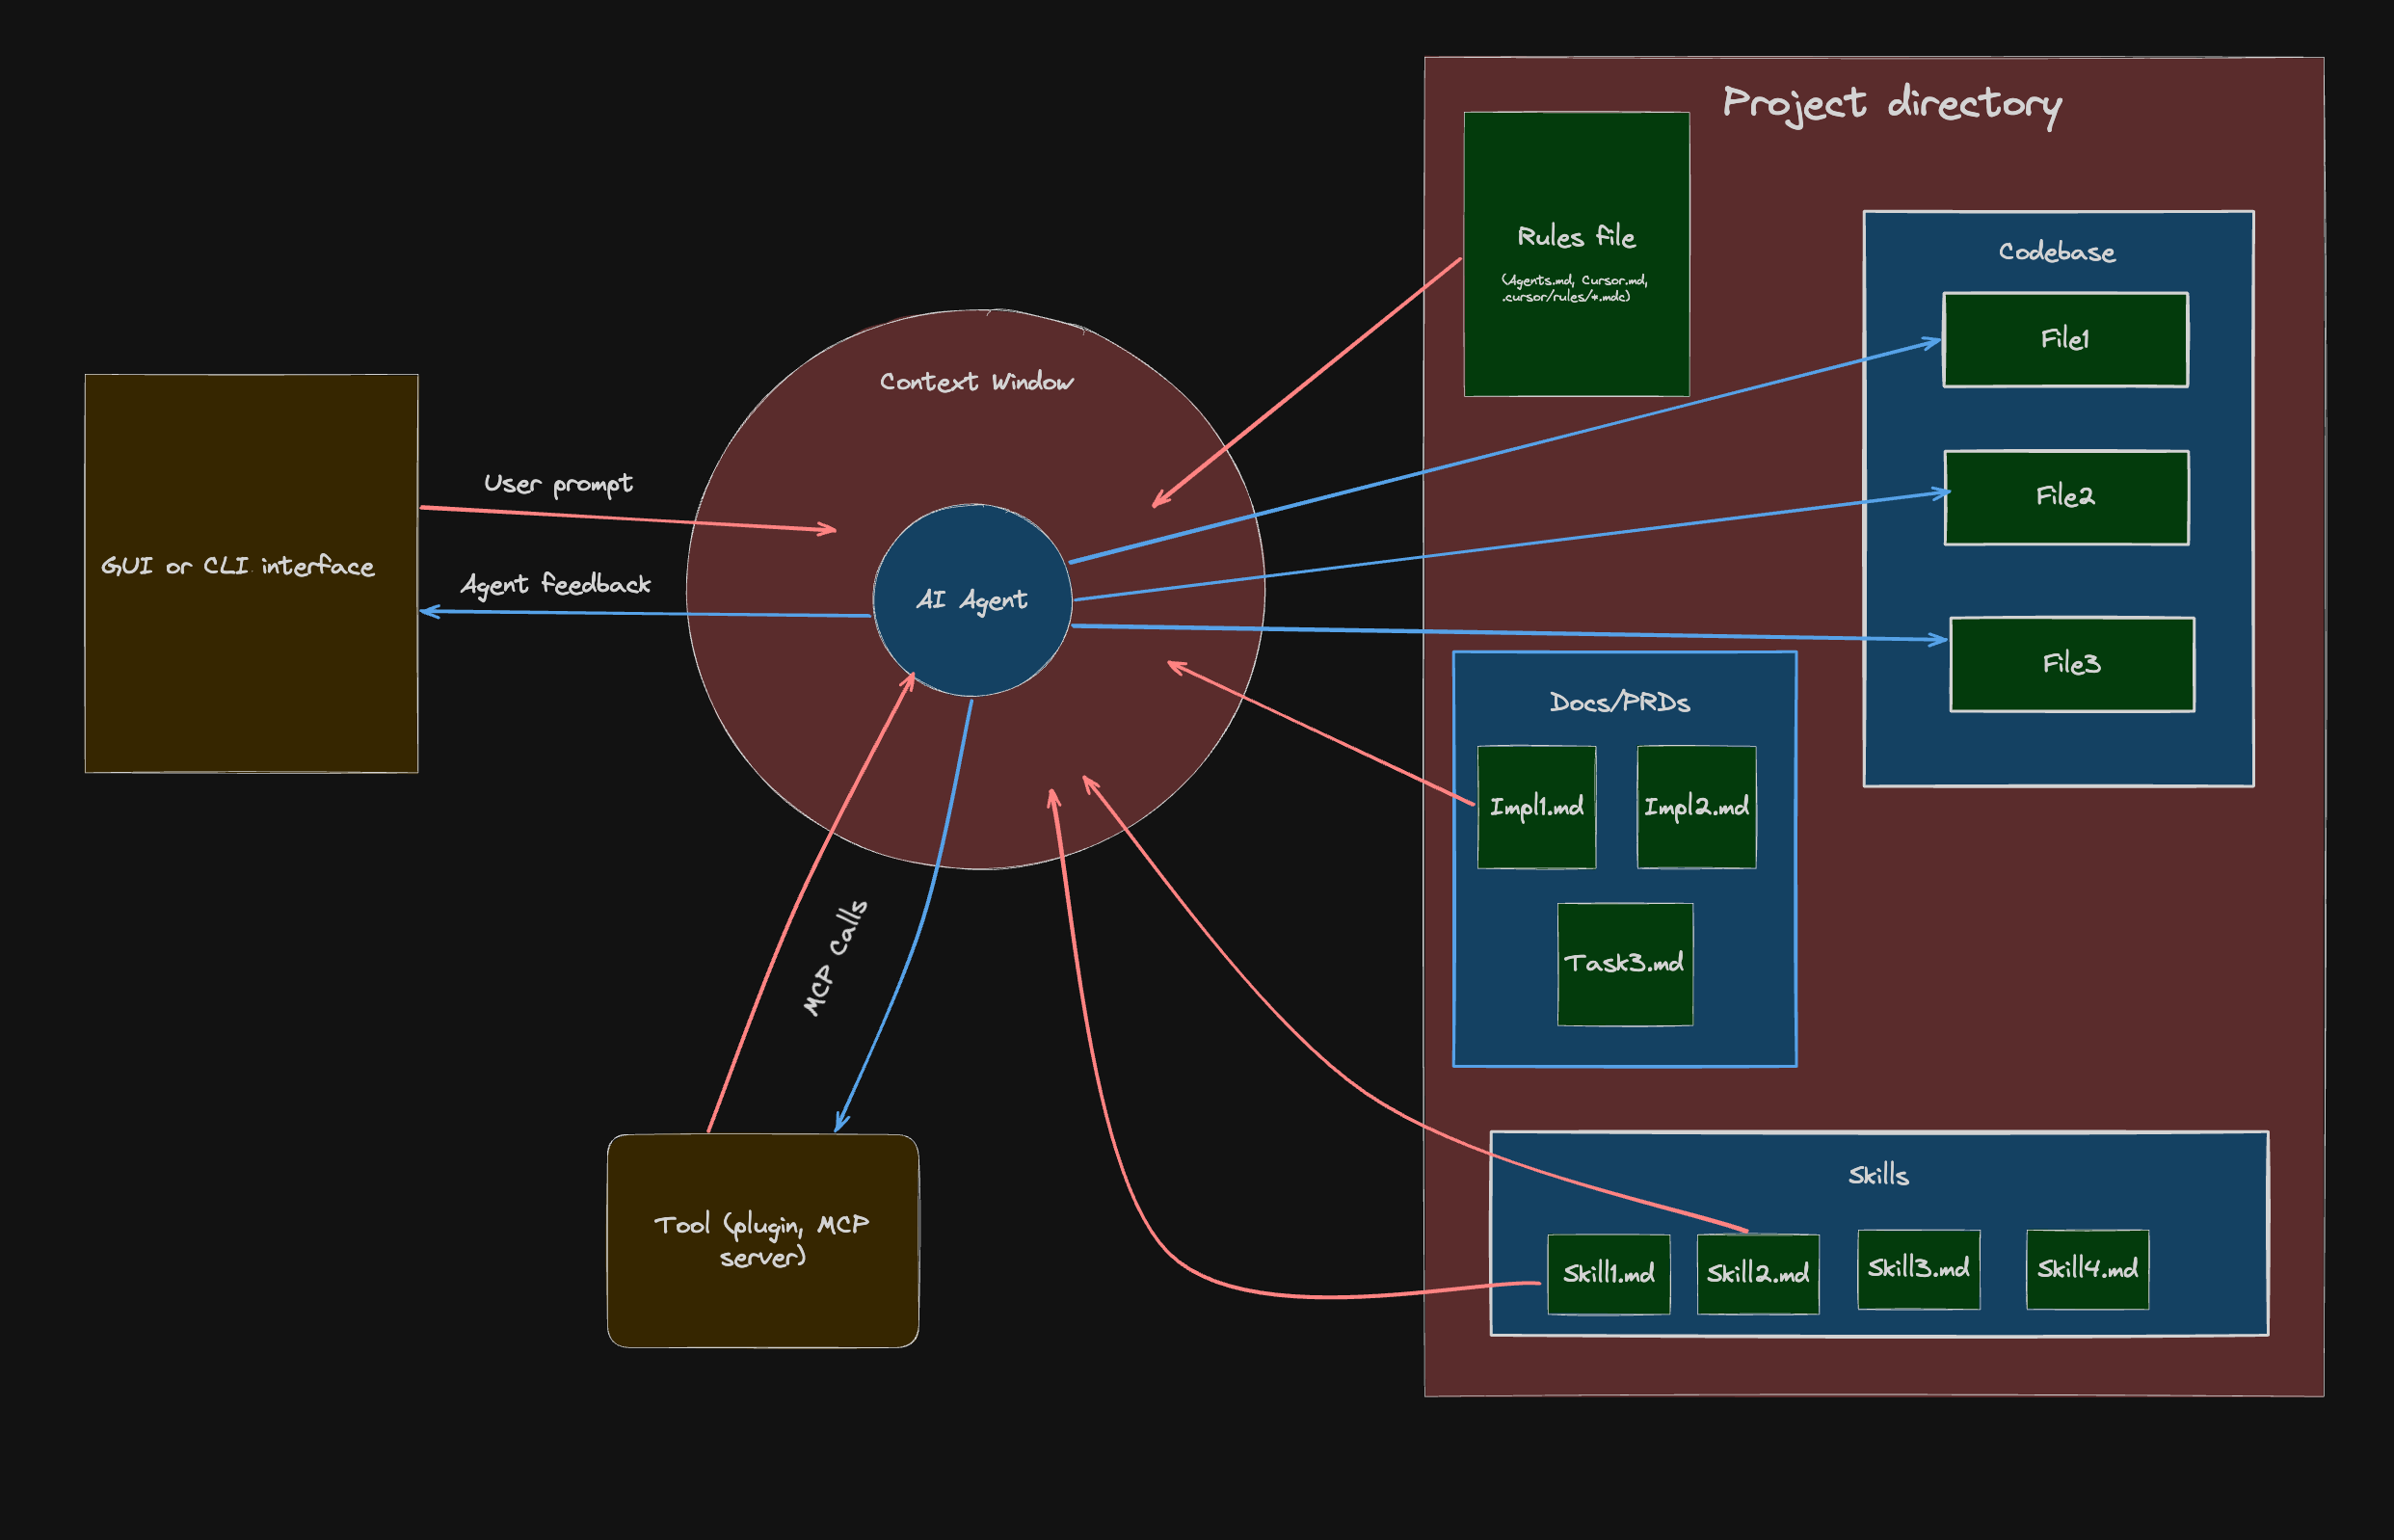
To understand how context-based engineering works with coding agents, it helps to visually see the architecture — how different components of your workspace interact with the agent.
The arrows show the flow of information: red arrows indicate input sent to the model, while blue arrows indicate output from the agent. Red shapes represent content spaces, gold shapes represent tools and applications, and blue rectangles represent scopes.
Here's a breakdown of the architecture:
Coding agent
At the core is the AI coding agent. This is the program powered by a capable LLMs like that makes changes and updates to the codebase based on instructions it has received. Some great for coding agents include:
Claude code (Paid): A popular AI coding agent powered by Anthropic's Claude Opus and Sonnet models. It is a CLI based coding agent. There is also a Visual Studio Code (VS code) extension and Zed IDE plugin. To use it you have to subscribe to Anthropic's Pro plan ($20 a month) or Anthropic's Max plan ($200 a month). You can also use the API plan which is a pay-as-you-go model that bills you based on usage.
GitHub Copilot (Freemium): You can call this the OG coding agent — released in June 29, 2021 as an intelligent tab completion AI companion. It is the default AI agent in VS code and it has extensions for other IDEs like Zed and IntelliJ. It gives you access multiple coding LLMs like Claude, GPT, Gemini, Kimi and Qwen. You can use it as a chat window extension or in the CLI. It has an limited free plan, a cheaper Pro plan ($10 a month) than Claude code, and a ($39) Pro+ plan.
Cursor (Freemium): A powerful AI powered IDE that gives you access to multiple coding models. It's is a VS code fork, so it wouldn't be hard to migrate to if you are a VS code user. It's relatively easier to navigate than other CLI tools and it a host of other great features. The free plan however, is very limited and their paid plans include Pro ($20 a month), Pro + ($60 a month) and an Ultra plan ($200 a month). You can also use their API plan.
Codex (Free and Paid): This is a coding agent made by OpenAI powered by GPT models. There is an intuitive GUI application and CLI interface. The UI of the GUI is intuitive and the GPT models rival Claude in frontend design and data science. You can use it with with limits for the free or subscribe to OpenAI's plan to gain more usage. The source code is open-source.
Opencode (Open-source): This is a very performant coding agent that let's you use a myriad of LLMs. One great thing about Opencode is that it let's you use paid models like Claude, Gemini and GPT alongside free open-source models like Qwen 3.5 coder, Kimi K2.5, GLM-5 and Gemma 3, some of which you can run locally on your own computer.
Other great mentions include WindSurf (which is similar to Cursor), Kiro (similar to Cursor but advocates for specs driven development), Gemini CLI (Made by Google and does more than just coding), Antigravity (Google's Cursor alternative), Kilo code (a robust coding agent extension on VScode), Pi (an open-source highly extendable AI model) and T3code (an open-source and more performant alternatives to Codex with GPT and Claude models). Just pick one and get going.
Personally, I use Claude Code (Pro plan) for both the VS Code extension and CLI for automated flows, alongside GitHub Copilot (Pro plan) autocomplete because they work great as part of my daily workflow. That said, I'm currently exploring tools like Opencode, Pi, and T3 Code, so this setup may change soon. If you're a student, you can apply for student programs by GitHub and other providers that offer free or discounted access to their agents.
Context Window
When it comes to context-based engineering with AI coding agents, the context window is a very important component. Context window is the maximum amount of tokens a model can process in a single conversation. When you start a conversation with a coding agent, a new context-window is created to track tokens consumed by both your prompts and the agent's responses.
Every prompt you send, every file the agent reads, every command it runs, and every response it generates eats into this window. Once the limit is reached, the agent starts losing visibility of earlier parts of the conversation, which can lead to repeated mistakes, forgotten instructions, hallucinations or inconsistent code. This is why being intentional about what you feed into the context window matters — the more focused and relevant the input, the better the output.

See the context window as the working desk memory of an AI model and their a just a limited amount things it can handle on it desk at a time.
It is easy to max out the context window of a model if you're working on a really large codebase. Coding agents also seem to “forget" about your codebase when you open a new conversation — almost like they can't recall the instructions you gave it in a previous conversation. This is because a new conversation has a completely different context window from the previous one.
In order to ensure your coding agent doesn't lose context of what it's working on and also not max out the context-window of the conversation, you need to provide instruction files with concise in the directory your working in.
Prompting Interface
In order to provide instructions to coding agents, you need a prompting interface. This could be a GUI chat interface, CLI commands, a terminal UI, or voice tools. When you prompt the coding agent, your instruction needs to be detailed yet concise so that the AI can understand exactly what you want it to build, why it matters, and how it should be implemented. Vague prompts lead to vague results. The more context you provide — such as the expected behaviour, constraints, and edge cases — the better the output.
Just remember, every prompt you send adds to your context window.
Project Directory
This is the working folder that the AI agent is making changes to. It contains the following:
Config files that dictate the behaviour, dependencies and environment of the application you’re working on.
Source code files used in building the application.
Test files that ensure the app and its implementations behave the way they are meant to.
Context files which include
README.md, rules files (AGENTS.md,.cursorrules), skills, and PRDs. Context files help manage the agent’s understanding of your project and keep it on track while making changes, without compromising code quality.
Rules file
When using coding agents to build an application, one of the most important files to have in your project directory is the rules file. This file is usually located at the root of your project and is the first thing your agent reads each time a new conversation starts.
The rules file explains the codebase to the agent: the file structure, tools and dependencies used, coding conventions, testing strategy, and any project-specific constraints the agent needs to respect.
The specific rules file depends on the agent you’re using. Claude Code uses a CLAUDE.md file, Gemini uses a GEMINI.md file, Cursor uses .cursorrules alongside .mdc rule files, and other agents follow the conventional AGENTS.md format. If you’re working with a team where members use different agents, I recommend maintaining a single RULES.md file in a /docs folder, then referencing it from each agent’s rules file in the root directory. Something like this:
@docs/RULES.mdThis way, you only have to maintain one file as your codebase grows and requirements change.
Keep your rules file concise. Don’t include implementation details or unnecessary explanations. Straight to the point and simple.
Check out this CLAUDE.md file I'm currently using for an open-source project I'm working on right here.
Product Requirements Documents (PRDs)
PRDs provide implementation details that the coding agent should follow for a specific task. Think of them as a guide that outlines what to do and how to do it. PRDs are task-specific and are usually named after the task they describe, e.g. integrate-google-oauth-prd.md. You can place these files in a docs/prds folder.
A typical PRD should contain at least the following:
Task specification
Implementation details
Workflow
Testing strategy
Acceptance criteria (with checkboxes)
PRDs are useful because they keep your coding agent on track with the changes that need to be made, even if you close a conversation abruptly and start a new one. You can point the agent to the relevant PRD and it will pick up from where things left off.
I recommend referencing the path to your PRDs folder in your RULES.md file. You can also prompt the agent itself to draft a PRD for a given task before it starts writing any code, then save it for future reference.
A general rule of thumb is keep task as modular and simple as possible. So if the task is too complex, it is recommended to break it up into even smaller tasks.
Skills
Skills are a relative new but highly useful convention. Skills are reusable instruction files that teach your coding agent how to perform specific tasks consistently. Think of them like recipes. Instead of explaining to the agent how to set up a FastAPI project with your preferred folder structure every single time, you write it once in a skill file and the agent follows it whenever that task comes up.
A skill file is typically a markdown file, e.g. fastapi-setup.md, material-design.md or nextjs-component.md, and you can store them in a docs/skills folder. Each skill should contain the steps, conventions, and constraints the agent needs to follow for that particular task. They differ from PRDs because unlike PRDs which are one-off task instructions that get completed and moved on from, skills are reusable across multiple tasks and conversations.
You can also install skills from online sources especially for best practices for external libraries and services your application relies on. Notable examples are anthropics/skills, callstackincubator/agent-skills (React Native), netlify's agent skills, microsoft's Azure SDK skills, and the Antigravity Awesome Skills library which contains over 1,200+ community-contributed skills compatible with Claude Code, Cursor, Gemini CLI, and other agents.
BE CAREFUL WHEN DOWNLOADING SKILLS, SOME OF THEM HAVE COMMANDS FOR PROMPT INJECTION IN THEM THAT MAY COMPROMISE YOUR SECURITYSkills are especially useful when you’re working on a project with repeating patterns. For example, if every new API endpoint in your project follows the same structure (router, service, schema, test), you can write a skill for it and the agent will replicate that pattern each time without you having to re-explain it.
I recommend referencing your skills folder in your RULES.md file so the agent knows where to find them.
The Codebase
These are the files that contain the code your application is built on. The codebase is what the coding agent interacts with to implement features, apply updates, and refactor existing logic. It is important that you understand your codebase well, especially if you’re building production applications that serve real users.
Your codebase should have the following attributes:
A well-structured and modular file architecture
Linting and code formatting tools (e.g. ESLint, Prettier, Ruff)
A test suite with meaningful coverage
Clean, readable code with consistent naming conventions
Version control with clear commit history and branching strategy
Environment configuration and secrets managed through
.envfiles and not hardcoded valuesDependency management with a lockfile (e.g.
package.json/package-lock.json,Cargo.toml/Cargo.lock,requirements.txt,go.mod) to track external packages and their versions
When your codebase has these attributes in place, the coding agent has a much easier time navigating and making changes without breaking things. A messy codebase with no structure, no tests, and inconsistent patterns forces the agent to guess, and guessing is where bugs come from. Think of it this way: if a new developer would struggle to understand your codebase, the agent will too.
Your rules file and skills help ensure the agent follows your project's conventions and patterns, but they're only as effective as the codebase they're applied to. A well-maintained codebase gives the agent the right foundation to work with, while a messy one undermines even the best instructions.
Tools
Tools are plugins and integrations that extend your coding agent's capabilities beyond just reading and writing code. Through protocols like MCP (Model Context Protocol), your agent can connect to external services and resources such as documentation sites, databases, design tools like Figma, project management platforms like Jira and Linear, and APIs. For example, instead of manually copying documentation into your prompt, an MCP server can give your agent direct access to the latest docs for a library or framework.
For one, I find the Figma MCP tool very useful on Claude Code because it lets me one-shot complex UI designs right from Figma into my React codebase saving me a lot of time and effort. Other notable MCP tools include:
Context7: Fetches up-to-date, version-specific documentation and code examples directly into your agent’s context, preventing hallucinated APIs and outdated patterns.
GitHub MCP server: Lets your agent manage pull requests, issues, and repositories without leaving your editor.
Linear MCP server: Connects your agent to your Linear workspace so it can read tickets, update issue status, and reference task details while implementing features.
Playwright MCP server: Gives your agent browser automation capabilities for testing, visual verification, and interacting with web pages.
Sentry MCP server: Lets your agent query error logs, unresolved issues, and stack traces from your Sentry projects to debug faster.
Tools are a productivity hack because they eliminate the back-and-forth between your agent and you. Without them, you'd have to manually copy documentation, look up error logs, check ticket details, and paste them into your prompts. With the right MCP tools connected, your agent can pull all of that context on its own, which means fewer interruptions, faster iterations, and more time spent building.
Now you have a clear picture of the basic components that up context-based engineering architecture, it great to know how to rightly approach context-based engineering.
The Ideal Context Engineering Workflow
The ideal workflow when it comes to software engineering with AI agents doesn't differ significantly from the regular software engineering. This means if you employ best practises while working like; writing readable code, breakdown complex task into simpler ones, documenting, and testing, transitioning to using agents would not be much of a hassle.
There is a step by step guide to approaching context-based engineering:
1. Start with a plan
Before you write your first prompt to the AI you need to start with a plan. Whether it's a minor bug fix or a complex end-to-end feature, you need to understand what you need to do and the direction you need to take. Don't just throw a prompt and tell it to build something and “not make mistakes".
The planning involves the following:
Start with some research and brainstorming, especially when you aren't clear about how to implement a solution or you don't fully understand the problem. You can use AI chatbots outside of your coding agent like ChatGPT, Claude, or Gemini for this or use plan mode. They can provide answers and point you to resources like documentation, videos, and articles that help improve your understanding. You can constantly refine your understanding by telling the AI to ask you clarifying questions.
Next, ask the chatbot to generate planning prompts that will help you create your rules file (if you're just starting the project) and PRD files. Specify the features you want to add and also specific tools you'd want the project to be built with. Here's an example of what a typical planning prompt looks like:
Help me generate prompt messages for Claude Code. The project is a ticketing app built with Next.js 15, Supabase and PostgreSQL. I need prompts that will:

1. Initialise the project and generate a CLAUDE.md file covering the tech stack, folder structure, coding conventions, and testing strategy.
2. Create a PRD for implementing user authentication with Google OAuth and email/password sign-up.
3. Create a PRD for building the ticket creation and assignment workflow.

The agent should use pnpm as the package manager and not npm.

The prompts should be detailed, concise, and ready to paste directly into Claude Code.
Review and audit the prompts generated. Ensure the prompts reference the correct files, dependencies, and conventions for your project. If anything looks off or too vague, refine it before passing it to your coding agent. The goal is to hand the agent a prompt that leaves no room for guesswork.
2. Set up the development environment
Once you have a plan and initial setup prompts for the work needed, it's time to set up development environment.
For IDE-based coding agents, open your project directory in the app and use your setup prompt to let the agent generate the rules file(s). For CLI agents, run the agent’s init command in your terminal (e.g.
claudefor Claude Code,codexfor Codex).Install relevant skills for the tools and frameworks you plan to use in your project.
Connect the MCP tools your workflow requires, such as Context7 for documentation, GitHub for version control, or Figma for design references.
Initialise a basic boilerplate for the project using the setup prompt, install the required packages and dependencies, configure linters, code formatters, and set up your testing framework.
Set up pre-commit hooks (optional but very helpful). With pre-commit hooks, you can ensure code is automatically formatted and linted every time a commit is made.
Add required environment variables that your app will be depended on like database paths and secret keys.
Verify that your agent can read your project files and run commands by giving it a simple test prompt before diving into the actual work.
3. Create Product Requirement Documents (PRDs)
Once you've set up your development environment and the agent has generated your rules file, the next step is to create your PRDs. Use the planning prompts you prepared earlier and pass them to your coding agent. The agent will generate the PRD files outlining the implementation details, workflow, testing strategy, and acceptance criteria for each task. Review each PRD carefully before moving on. If something is missing or unclear, refine it now rather than letting the agent start building with incomplete instructions. Once you're satisfied, save the PRDs in your docs/prds folder and reference the folder path in your RULES config so the agent always knows where to find them.
If a task to outlined by a particular PRD is too long and complex, consider breaking it down into smaller, simpler PRDs. You could also add indexes or number your PRDs to let the AI know the sequence of execution.
4. Execution
At this stage, it's time for the agent to start making changes to your codebase. However, there is still a need for a human in the loop, and guardrails need to be in place. Here's how to go about it:
Start by instructing the coding agent to set up tests based on the details in each PRD. Unit tests for functional requirements, integration tests for workflows that span multiple services, and end-to-end tests for critical user flows. Test will ensure that the code written by the agent behaves exactly as it should.
Point the agent to a PRD and instruct it to implement the feature. Let it work through the task, then review the output. Check that the code follows the conventions in your rules file and handles edge cases. If something is off, don’t just tell the agent to “fix it” — be specific about what’s wrong and why.
Once you’re satisfied with the implementation, commit the changes. Keep commits small and focused on one PRD at a time. This makes it easier to track what changed, roll back if something breaks, and keep your git history clean.
Run the application and preview the changes locally. Test the feature manually to make sure it looks and behaves the way you expect. Automated tests catch logic errors, but they won't tell you if a button is in the wrong place or if the user experience feels off. If you spot any issues, feed them back to the agent with clear descriptions before moving on.
Run your tests to confirm everything works as expected. If any tests fail, point the agent to the failing tests and let it fix the issues before moving on to the next PRD. Repeat the cycle: implement, review, commit, test.
If two tasks can be run in parallel, for example a frontend component and its corresponding API endpoint, you can spin up multiple chat windows to work on both simultaneously. Some agents like Claude Code have sub-agents that handle this natively.
If everything is great, commit your code and push the branch with your changes to GitHub
5. Final Code Review and Quality Assurance
Before you deploy changes live to production, there needs to be a code review process. This can happen at a team or individual level. If your a solo dev, I recommend you have one main branch and use feature-branches make pull request to your main branch. This is make it similar as working with a team. Here are few recommendations:
Set up a CI/CD pipeline that runs tests and checks code quality to ensure the code works and is safe to deploy. A tool you can use for this is GitHub Actions.
You can use code review agents like CodeRabbit, Greptile or Copilot Review to automate pull reviews. From personal experience, I find CodeRabbit really useful in catching issues that are easy to miss, such as security vulnerabilities, inconsistent patterns, and missing edge cases.
Use preview deployments to test your changes in a production-like environment before merging. You can set this up with an cloud services you use to host your application.
If every checks out, the changes can be merged and the update deployed.
Final Remarks
Context-based engineering is not about replacing developers with AI. It's about being intentional with how you use AI to build software. It also not vibe-coding because you are involved in the process.
Remember, the tools are powerful, but they're only as good as the context you provide. Ensure you set up the right environment for the agent to work with: a rules config, a clean and modular codebase, and well-written PRDs. If you do it right, you'll reap the benefits in productivity, excellent code quality and speed.
PS
This article only scratches the surface of using coding agents in software engineering. Dome Academy will be hosting live sessions where we walk through these workflows in real time so you can see context-based engineering in action. I'm also writing an 'AI-Powered Developer Handbook' which will be a comprehensive guide covering advanced prompting techniques, automation strategies, real-world project walkthroughs, and practical strategies for building production-ready applications with AI coding agents. Stay tuned.
Resources
What is the Model Context Protocol (MCP)? by modecontextprotocol.io
How To Make Codebases AI Agents Love by Matt Pocock
5 Best MCPs for Developers by snyk.io
MCP, Skills, and Agents by cramr
9 Ways AI Coding Has Rewired My Brain by Matt Pocock
My Skill Makes Claude Code GREAT At TDD by Matt Pocock
The Unbeatable Local AI Coding Workflow (Full 2026 Setup) by Zen van Riel
Don't forget to like and leave a comment.
 | A guest post by
|